In this video we talk about the fastest way to build strong shoulders at home. Here’s what we cover:
- Simplifying your shoulder training to one goal that unlocks handstands, handstand pushups, handstand presses, complete shoulder muscle development and full-range mobility
- How to start training towards this goal from zero strength requirement using no special equipment
- How to train with maximal efficiency to make rapid progress in less than 3 minutes a week
- The ideal programming to optimise results while minimising risk of injury
- Measuring weekly progress to guarantee success
Video summary
This video outlines a highly efficient training method for building strong, mobile shoulders through a specialised handstand pushup progression. The key points are:
- The goal is to train toward the handstand pushup, which builds strength in the upper chest, shoulders, and triceps, enabling other handstand-related skills. [10:54]
- The training involves scaling difficulty by adjusting the placement of the feet to shift weight onto the hands, finding the point of failure and using forced negatives to maximise the training stimulus.
- The protocol involves just one set per week, focusing on progressive overload and tracking improvements in the first rep of each session. [09:52]
- Pairing this vertical pushing movement with a complementary vertical pulling movement is recommended for balanced upper body strength development.
Full transcript
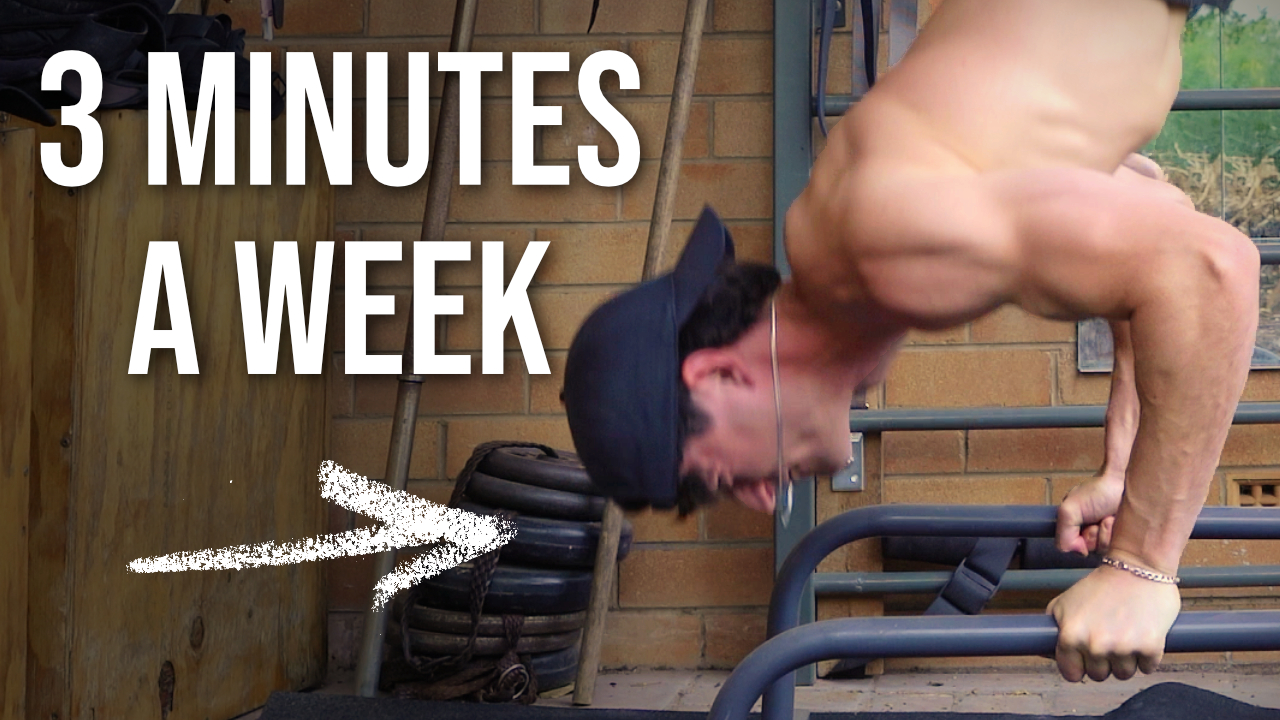
You could do this and this and this, spend a couple hours a week in the gym and maybe get stronger shoulders, or you could spend less than three minutes once a week training from home, build up to this and achieve all this as a byproduct along with guaranteed muscle and full range mobility in your shoulders. If this is all sounding too good to be true, excellent. This is what I’ve done exclusively over the past five years and teach all my students to do two from all ages and starting levels of ability. It’s one of the six movements that we train each week totaling less than 40 minutes a week of training, and in this video I’m going to break down exactly how to do it from any starting level so that you can go and test it for yourself and see very quickly why this process is not just some imaginary magic pill, but actually just the most straightforward, potent method that you can use if you want to build strong shoulders fast.
So I’m going to show you how you can start training this yourself at home. In terms of equipment, if you have rings or parallettes, that’s ideal if you’re going to get started, minimum barrier entry. Any low elevated platform that you can put your hands on will do. You can use the steps and bricks, some low stools. As long as you can lower your head past your hands, you can start training. The other thing you’ll want to start scaling things up is an elevated platform to put your feet on. So stool chair, box, something sturdy. If you have furniture in your house, you should be able to find something that works. So the goal for this movement pattern to build up strong mobile, great looking shoulders, we want a really high level vertical pushing goal and for us, that is the freestanding handstand pusher. This is our north star that we’re aiming to get to long-term.
The point is not to start here. I trained for many years to get to this point and you can see what reaching that level of strength and body composition did to my physique. The point is to build towards it over time, the closer you get, the better you’re going to look, feel and function. The cool thing about this movement vo bushing is that building strength and it not only builds the muscles in our upper chest, our shoulders, our triceps basket, it gives us the overhead pushing strength to do all adjacent handstand related skills. It’s got a lot of people asking me, what’s the best way to do learn handstands, hands and presses all these fancy tricks you seeing me do. I don’t practise them outside of a few reps to get a decent looking video. It does not matter how much practise you do for these things if you don’t have the raw full range of motion strength in your shoulders.
It’s like trying to balance a piece of cooks spaghetti. It’s going to be very, very difficult. What we want is to be strong like a rod, have the raw ability to hold ourselves in that position and then all of these skills are very quick to learn. I’m able to just manhandle my way through these dodgy looking forward presses because I’ve built that strength by building this movement that I’m going to show you how to train. So like with all body weight skills, if in doubt strength is king, don’t put the cup before the horse. All I do is these six movements and give me everything that I’m interested in doing on rings, bars of floor, and realise that building that strength comes from literally your body building raw muscle tissue. There is no shortcut. We cannot get stronger past a complete beginner level without the relevant muscles getting bigger.
So you can’t technique hack your way to a handstand press, a handstand pushup, and you can’t speed up that process in any way beyond simply maxing out that weekly muscle growth signal and letting your body go and do the groin. So let’s look at how to do that. We’ll start looking at progressions, then I’ll show you how to scale the difficulty to optimise that training signal. Then we’ll look at balancing training volume and frequency to get the best results as fast as possible, as safely as possible. And then finally, how to measure your progress, ensure you actually are getting the results from the work week after week. Okay, so progressions. The first thing with any of these movements that we want to learn to train, the first thing we need to be able to do is guide ourselves through full range of motion reps without any load on the working muscles.
If we can scale to zero, it means regardless of where we’re starting with our strength, how tired we get when we’re training. We can always train as long as we decide we want to, and we can always hit full range of motion on those reps we’re training. So this is the baseline skill we’re going to get for the handstand. Pushup zero basically looks like standing still on your feet and guiding yourself through from an overhead position all the way down to where your shoulders touch the rings or the bars or your wrists. So whatever piece of equipment you’ve got, go to it now, pause this video and practise moving through that full range of motion because you need to be able to get back to this point when we start to load things up. So full range of motion looks like starting in this overhead position where our shoulders literally touch our ears.
That’s how you know you actually reach full shoulder flexion. It’s really important to start and end your reps at that point so that you build strength in this overhead position, especially if you want to build things like handstands, handstand presses, and ultimately the freestanding hand sample shot. And four range of motion, as we said at the bottom means making physical contact between wrist and shoulders. So you should have those two touch points at the start and end of every positive you do, every negative you do. So that’s range of motion to get the right plane of motion to make sure we’re actually doing vertical pushing. The thing we want to do’s moving is keep our hips up at all times. So when we start to scale the difficulty up and down, what we’re actually going to do is move our feet. We’re not going to drop our hips.
The tendency when you start to try and load weight onto this movement as you get tired to scale down as for your hips to drop, we never want to do that. We should be able to guide ourselves through a full rep here at zero with our hips staying up the whole time relative to our shoulders, keeping our TOSA between this 45 and 90 degree angle with the ground. And this replicates what it will look like when eventually we have all our weight on our hands. We’re doing a full free standing hands up push up. Okay, so let’s look at how to actually scale it. Difficulty up now that we found zero, we have a baseline, we have a place to return to when we get tired. How do we actually add difficulty and find that point of max intensity so that we can start training, pushing against as much resistance as possible and getting stronger in less than three minutes a week?
As I said, what we want to do is move our feet. So the first step here is to bring our feet back to the starting position and start to lean onto our hands. The variable with the handstand pushup is all about the percentage of your body weight that is on your hands versus your feet. So at the start, we can start with a hundred percent of our weight on our feet, zero on our hands, but full free standing movement has a hundred percent of our weight on our hands, zero on our feet. Every single progression or position in between those two extremes is just a variation in that balance. And so to start to shift the weight forward onto our hands first, we can literally just put our feet back to this position, bring our hips up and over and start to lean our body weight onto our hands, and there’s a certain amount of weight we can get there.
Now our goal here is to find failure. So the easiest way to do this is to start with the negative and find the point where you do start to fail. So what I want you to do, get on your training equipment, bend your elbow slightly and start to stack your hips over until you find the point where you start getting forced down. If you’re a strong or done some training and you have reasonable shoulder strength, this might not be enough weight and that’s fine. The way that we’re going to scale up further is by bringing in that chair elevated object and bringing our feet up onto it. What that’s going to allow us to do is shift more of our weight onto our hands while keeping our hips up. So then you can do the same thing, bring your hips over, get more weight onto your hands until you find the point where again, you start to get forced down.
The key is to always be trying to push up. Remember to make our training maximally effective and get all the work for the week done in a single short set, less than three minutes, we want to be always training at our strength limit. And so for the negatives, that means trying to push up or it makes things so heavy that we’re forced down. So we want to first find that point where it’s impossible to hold ourselves up. And for most people, beginner, intermediate, you should be able to find that somewhere here. If this is still too easy for you, what you can do is keep bringing your hips forward and over until your feet no longer touch the platform they’re on. Then you can put ’em on the ring straps and at that point you should be able to find a point of failure and force yourself down.
And what we want to do now is literally just push back, try and push up as hard as possible, force ourselves down to the bottom. If we start to get too hard and we start to fall, we just scale back. So this is why it’s important to know where zero is. You can just move your feet from the straps to the box, from the box to the floor, and from the floor forward as much as needed to catch yourself and slow down that descent. If you’ve done this successfully, you’ve now done a force negative, which is like the secret to hyper effective training. So congratulations. All we want to do for the way up is just reverse that. So push up, get stuck again, rather than dropping our hips from our vertical movement pattern, what we want to do is just move our feet as needed.
So again, if we’re starting to push our feet around the platform, it’s too hard. We can just step them down, guide ourselves through it. And again, training maximally effective here is just about moving between these levels of progression as needed to keep getting stuck the whole way up. Just like you force yourself down the whole way down. Talk about this concept more in other videos, but this is how you do it. You’re just moving between feet positions and amount of weight loaded on your hands within that foot position to keep the difficulty perfectly difficult for you throughout every single inch of this movement all the way up and all the way down. So that’s basically it. As you get stronger, you can start to really lean into more of these strap assisted variations down the line, and then eventually use less and less of the straps until for some of the start of your first rep, you’re able to do unassisted work.
And then from there, it’s just about continuing and pushing for more strength until you can get the full range of motion without help. But that’s basically what the levels of progression look like. This is I think, the most technically difficult movement to figure out. It’s the hardest one to teach because it feels very unintuitive. So if you’re struggling initially that normal, as long as you can get some max effort working, hit the full range of motion and try to keep your hips up so that you are actually pushing vertically as much as possible. You’re going to be able to make progress. How to programme this into your week in terms of volume, frequency, one set once a week. That’s it. Give yourself that framework within which to train max effort from the start, fail your whole way through the rep, and we’re just doing one set so you can have a brief rest in between reps if you need to get your breath reset.
I stop in between positive and negatives just to make sure I’m getting the full range of motion and have a chance to reset in between them, but try to keep going and keep it to one continuous set so that you can listen to your body’s signals easily. And what you’re listening for is as soon as the set stops being fun, you’re done, finish the set. That’s your training for that movement of the week. And if you’re feeling itchy, you feel like you’ve got more in the tank to give, come back next week and give it. Make that set count for more than this week’s. If you keep doing that week after week, coming back, doing one set with proper intent, trying to be stronger, trying to push your limit, you’re going to improve. And that’s all that’s got to happen. In terms of measuring that improvement, what we want to see week to week is that in that first rep, at the start of our set, at the start of the rep, we’re able to do a little bit harder, a little bit heavier of the progression than we could the week before.
So you start in this PI position, you’re trying to overtime and get more and more weight on your hands. Your single goal is to get to the point where you can put your feet up on that platform. For some of the rep, it doesn’t need to be the whole thing, but if you can get it for some range of motion, you know that now you’re stronger than you were before, and then you repeat that process, trying to get more and more weight on your hands until your feet start to come off that platform for a bit of the rep. Maybe it’s just at the bottom, but then over time you build to the point where you can flick your legs up just at the bottom of the rep. You don’t even have to move, but now you’re holding your shoulder stand and that’s a very exciting, fun place to get to.
It’s probably more within reach than you think. From there. Next goal, try and get a bit of range of motion. Get to this shoulder stand. Legs are on the straps, and then you try and push up, get a little bit of strap assisted range, and then once you can start to really get some range there, the goal is to get it without any help from the straps and by that point, you’re off to the races. So that is it. That’s essentially the process for building a handstand, pushup and all related handstand movements. Critical things and key mistakes I see with most people that do this are not hitting full range of motion, which leaves parts of that range, untrained and muscle and strength and mobility gains on the table. Dropping hips when things get tough, which pulls you out of the handstand pushup strength and again, means that you’re not building strength in that plane of motion that we’re trying to build strength in.
And then with all the movements, it’s just about dialling that difficulty. And so you actually do work as hard as possible at every single point in those reps. That’s the skill of training. You learn it, you’re going to be able to make as much progress as physically possible in, as I said, less than three minutes a week, once a week, which is pretty cool. If you are training these properly, you want to be training the reverse movement pattern as well to the same level. So the highly suggests you are pairing this with your vertical pooling movement. Doesn’t have to be on the same day, but once a week as well. Exact same protocol. Here’s a video you can watch if you want to go learn how to do that. Alternatively, if you like this, you want to see what it looks like to do this in the context of a complete system. Full free training on this method is below first thing in the description. Otherwise, go use this, start training, start getting stronger. Lemme know in the comments what you’d like to see next, and I’ll chat to you soon.