In this video, we talk about how to get flexible forever using a simple five-minute routine. Here’s what we cover:
- The strategy I’ve used to build permanent, long-lasting flexibility with very little time
- The 5 lower body movements I’ve applied this to to unlock complete lower-body mobility all calisthenics skills
- A follow-along demonstration of the entire routine, so you can try it out for yourself
Full transcript
Most people don’t need that much flexibility, but not having enough to simply move with freedom and not feel stiff getting out of bed, that’s pretty grim. The reality is flexibility just isn’t really a concern for me. I spend always no time thinking about it or working on it, but that’s because I already have more than I need and I think that’s a place that everyone should at least know how to get to because if you’re not at a solid baseline of flexibility yet, well, it’s potentially life changing. If I ever want more lower body flexibility, I have a simple five minute routine to build it fast. I can apply that once or twice a week and get it to whatever level I want. And in this video I’m going to show you exactly what that routine looks like, walk you through the whole thing so that way you can just follow along and find out for yourself how stupidly effective this is.
Now, if you haven’t watched the original video, breaking down the theory of building permanent flexibility yet, I’d suggest starting there. If you have, then here’s how I suggest using this video. Watch it all through once to get an idea. Then you can come back, take your time, try it out for yourself. So if you’re ready, let’s ab. So just like we have clear movement goals for each of our six basic claims of motion for strength training, there’s five lower body flexibility movements that are going to work on in this routine. Do this routine properly, it’s going to take about five minutes. I’d suggest repeating it once or twice a week, once it’s going to work. You can do it up to twice a week if you want to get there quicker. And once you are happy with your accessible range of motion, you can literally back off to just doing this when you feel like it.
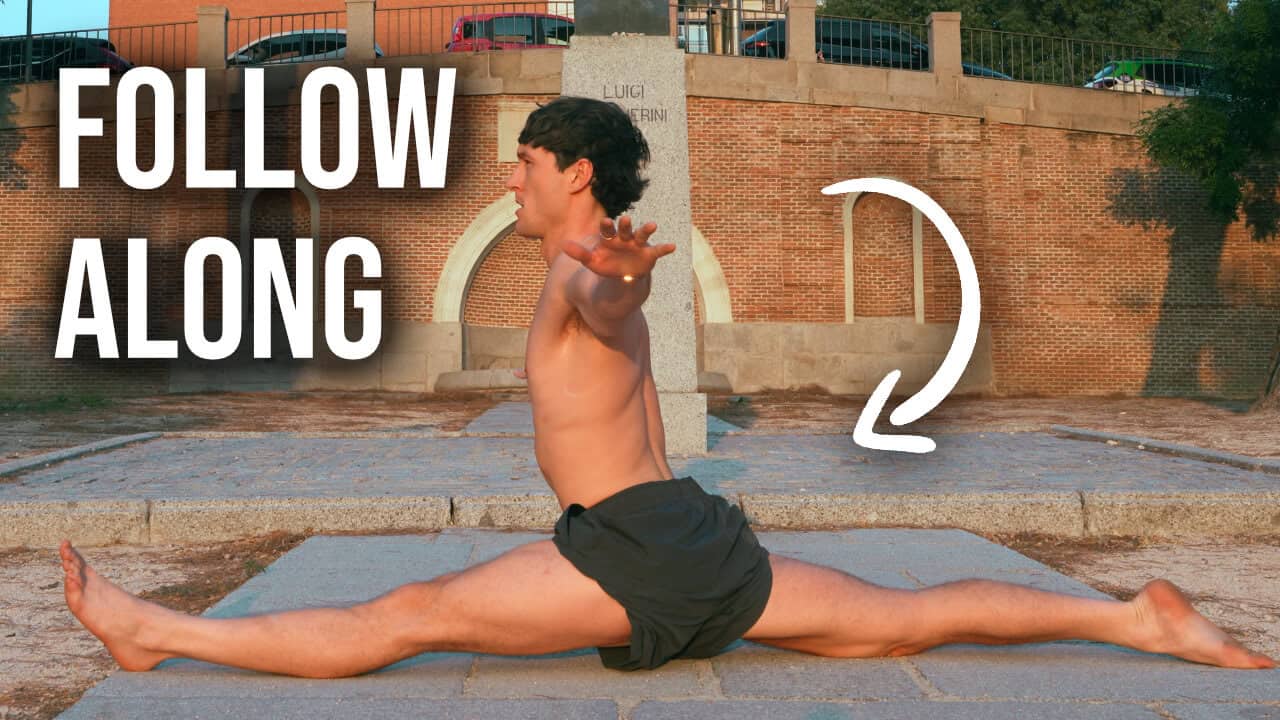
And you’d be surprised how little you need to be able to maintain this long-term. Unlike with strength training, I don’t see this as a forever thing. Build your range once, then you’re free to use it forever. Okay, so first up is the park. So this is where we go from touching your toes to going way deeper. These are going to help unlock your lower back, help with things like sciatica and allow you to do movements like park presses if you’re into that sort of thing. So I gave a fairly good breakdown of this in the original video, but what we’re just trying to do is pull ourselves as deep as possible into this park position, keeping our legs locked feet together, pulling ourselves hard into the movement with our hands and resisting as hard as possible with the stretched muscles. So our hamstrings, our curl, whatever you’re feeling, tension in flexing those as hard as possible with the goal of building strength in that deep position.
So we’re not trying to go as deep as we possibly can, but we’re trying to flex as hard as we possibly can in a position that is close to our end range, where we start to feel our body tensing up by exerting as much force as possible with those stretch muscles in that end range. We build more strength there and that is what allows us to access more range and we stack that up session after session after session. Eventually we can go much, much deeper because our body now feels safe because it’s strong in that position. So that’s the park. Now we move on to our pancake and very similarly, this is going to work a hip flexion with our leg spread. If you want to build up things like stall oppressors, straddle ls, those sort of gymnastics movements, this is a key movement to work on.
So just like with the park, I used to use weights for this and then realise it is much easier and just as effective to pull yourself into it. So most of the load here, some is coming from my body weight, but most of it is coming from me pulling myself down into the movement with the opposite muscles to the ones that are being stretched. And just like with the park, the goal is once I feel tension in the stretched muscles, which in this case are along my inner thigh, I’m just trying to flex them as hard as I possibly can so I get stronger in that position. Now if you’re starting out with this is very likely you won’t even be able to get into the starting position here if you’re finding it impossible to get any leverage, what you can do is elevate your hips onto something so that it tilts you forward and allows you to get your torso forward and pull yourself down into a stretch position.
So if you need to starting out, sit on something to do this, but it shouldn’t take you long to get to a point where you can just sit on the floor, do it like I’m doing it, and you’d be surprised how quick you can get from a very demoralising range of motion to really quite deep just having some ab cramps here. And that’s the pancake took me initially maybe a couple months of doing that twice a week to get to chest to the floor. It’s not quite that good now, but still very usable. So now we move on to the front, but so all the questions are asking how do you train this? Again, we want to do reps of max effort at the end range, like with the other things. And I go with most of these things for a somewhat arbitrary benchmark goal of 10 reps each side.
And so the way I achieve this with the front splits is to just have my front foot be able to slide. So in this case, we’ve just got floorboards and a sock and the goal is to have a straight front leg and try and keep my hips facing forward. And the goal here in terms of the stretch, yeah, you’ll probably feel somewhat of a stretch in your front leg, but what we want to focus on is the back one. So this is really a hip extension exercise and we want to keep that as our focus. So as I slide my front foot forward, I start to feel a stretch in my hip flexors, and as I do, I’m tensing them as hard as possible. So what I think about here is driving that back knee into the ground or trying to push my hip, the front of my hip.
In this case it’s the right one. So the one that’s at the back trying to drive it forward. So don’t think about trying to get deep into the splits. Don’t worry about the front leg. All I’m thinking about is the rear hip and trying to flex it as hard as possible tense those hip flexors against the direction of the movement. And as I do that, I unlock more and more range. And over time just getting better at the flexion of that hip, you’re going to unlock more and more range with your hip extension and therefore with the front split and the whole thing feels comfortable and easy. The main problems with this can arise if you are focused more on getting deep or trying to do the front split because the natural tendency can be to pivot your hips to avoid that extension of the hip flexors, which is the main set of muscles under stress needing to be stronger to do this movement properly.
So just like with all these movements in this routine, rather than focusing, like I said before on getting deep, we just want to focus on the muscles that are naturally tensing in response to the movement and put all our concentration into flexing them as hard as possible. Our goal is strength. That is how we build flexibility. It’s by building strength towards our end range of motion so that our body then says, okay, cool. We’re safe here. We can pull ourselves out of it. We’ve got the ability to protect the joint and if our nervous system allows us to use that range of motion and then we can access it whenever we want for whatever we want to do with it. So that is the front split sorted. The next movement we’re going to move on to here is the side split. So for this movement, we’re training hip abduction strength, so our ability to use our inner thighs to pull our legs together in an abducted position, which is what you see in a side split.
So the movement I actually used to train this strength is a horse stance. This recommendation came from a really good book on this concept called stretching scientifically. But the goal is to just have your feet parallel facing forward and spread them at a distance where you can get your thigh parallel to the ground in the deepest position. Once you can get your hips lower and get past parallel with your femur, then you can spread your feet wider and continue just doing that rep to rep until you finish your set. And I think this movement just puts a lot less stress on your knees. It’s a much nicer, safer way to train the exact same strength you use in this position. The side split. So once you finish your set, you can always do a test and see what range you’ve unlocked in the actual side split position, and then that is the side split done.
You’ll notice I’m far from the full thing with mine, but I don’t really care. The amount of times I need to use a side split in my daily life doesn’t really warrant putting the effort required into building it. If anyone can be bothered taking this further towards the full splits, then please let me know how you go. And then the final movement here is the pigeon. So this acts as an external rotation counter to the internal rotation. We train with our hips during the side split. It’s a stretch of your glutes, the muscles around your outer hip. So let’s look at this video just to give you a slightly better perspective so you can see what’s going on. The idea is to have your lower leg perpendicular to your torso with your knee at 90 degrees. So again, like with the pancake, you can elevate your knee if you need to give it some support, you can put a cushion or something underneath it and then reduce the heart of that over time as you gain more range.
Again, the idea is to just find the muscles that start feeling tension in them and flex them as hard as possible. So I think about driving my front ankle into the ground, which is basically resisting going deeper into the movement with all of them. And you notice I didn’t really do the 10 rep thing here. I don’t have that much of a goal to get further with this, so I just do enough to feel satisfied. But if you’re building this initially, you can move in and out of the movement, just like with everything else, do 10 reps each side and you are sorted. So there you have it minus testing reps. The whole routine as of this recording came in at five minutes and 40 seconds. You don’t need a rest in between your sets, so you can just go back to back to back and smash it out. If you want to deeper dive into any of these movements specifically, let me know. And if you want to see the upper body shoulder mobility version of this as well, then I will plan to make a video on that. As always, if you need help with your strength, body composition or fitness in general, hit the link below. A lot of you guys asked to see this video, so I hope it helps. Please let me know what you want to see more of in the comments, and I’ll chat to you soon.