In this video we cover everything you need to be able to train at home, forever. Here’s what we cover:
- All the gear I’ve used to build my strength and physique from home in 40 minutes a week
- The three tiers of importance when deciding what equipment to invest in first
- Complete setup options to suit any budget from under $100 to over $1000
- How to make this work perfectly even in the most cramped apartment living space
Video summary
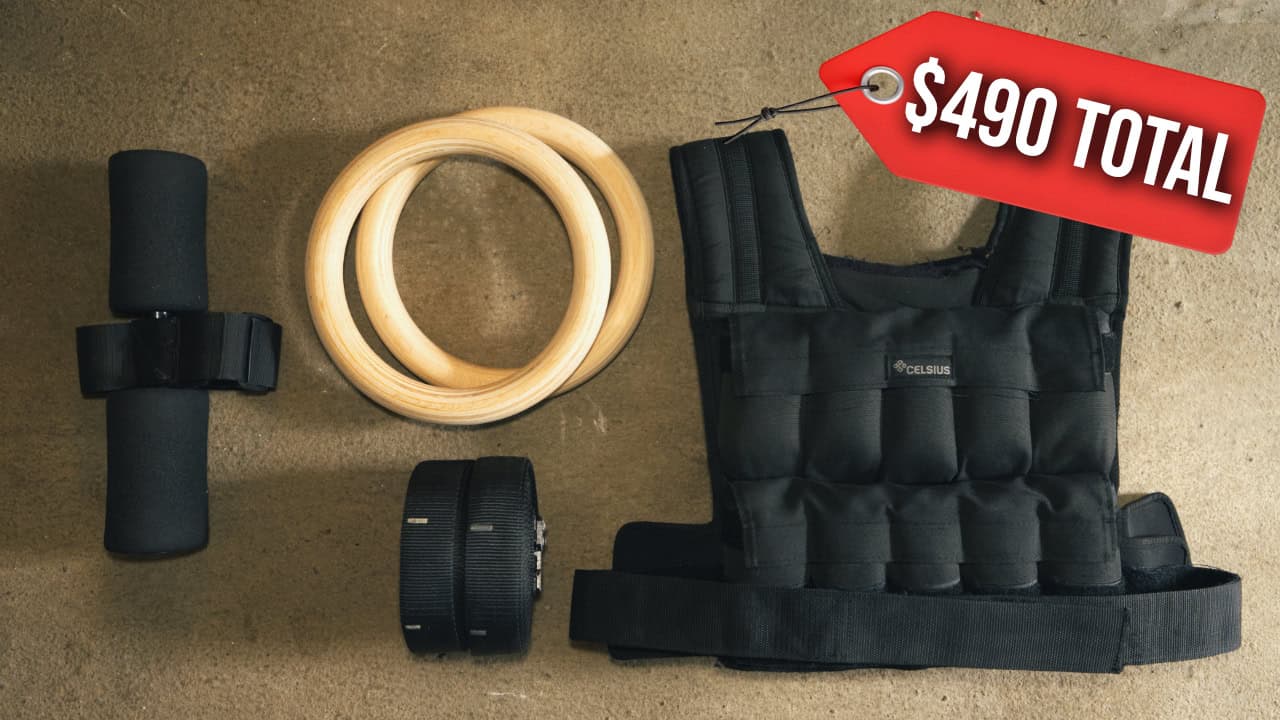
This video outlines a detailed home gym setup that allows you to transform your body with just 40 minutes of training per week. The key components are:
- Gymnastics rings: These are the most important piece of equipment, allowing you to train your entire upper body. Rings can be purchased for $30-$120 and can be hung from a variety of overhead anchor points.
- Nordic strap: This $30 accessory allows you to perform Nordic curls to train the knee flexion portion of the lower body.
- Elevated platforms: Simple items like stools or boxes can be used to support single-leg squats and upper body exercises.
- Weight vests: Two 20kg weight vests ($340 total) allow you to progressively load single-leg squats.
With this simple setup, you can effectively train your entire body and make significant strength and physique improvements with just 40 minutes of training per week.
Full transcript
If you have a hundred bucks and can spare 40 minutes a week, then you have everything you need to start transforming your body. And if you have $500, then you have everything you need for life. In this video, I’m going to walk you through my full home gym setup That’s allowed me to do all my training for the past five years, hit my lifetime strength goals, and build my dream body with under 40 minutes of training a week. Just like with training itself, the gear you use does not need to be complicated, but unless you want to keep slogging it out in the gym doing hours of traditional training each week, you’re going to need your own setup. So I’m going to show you what that looks like, how you can get started with all this for less than a hundred bucks and give you options to make this work for any budget and living arrangement.
Even if you live in a tiny cramped apartment, watch this and there should be no excuses left to start building strength and transforming your body every single week. So there’s three basic tiers to training equipment in terms of return that you’re going to get on your investment and I suggest taking them off in order. So tier one will cover your upper body for life and get that done for less than a hundred bucks. Tier two is going to cover half your lower body. You can sort that out for another $30 and then tier three is going to sort the remainder of your lower body. Now I suggest walking out a couple hundred dollars to get this sorted when you can. There is a way to do it for free when you’re at a pinch that I can run you through as well. So let’s go through these in order starting with the most important.
So tier one gymnastics rings, these things are one of the best investments you could ever make for your body. When people see our 40 minute a week training method and say, how can I do this without rings? My response every single time is get some. Just having a set of these will allow you to develop your entire upper body from beginner all the way to elite. You can start on these doing pushups, rows, feet, assistive chin ups, build all the way to levers, plan to pushups, one arm, chin ups, everything in between. There is nothing else you need for your upper body. It’s hard to imagine a more potent tool when used well. So in terms of what to get, the first thing is just to buy your rings. I suggest if you can get wooden, I prefer the 28 millimetre diameter just because they’re a bit smaller than the big ones.
Feel a bit nicer in the hands. That’s really down the preference in Australia. Iron Edge make my favourite ring that I found. They come in at 120 Aussie dollars, but if you’re in a pinch, the most basic setup is to just buy a pair off Amazon. You can get ’em very cheap in the us, get timber rings if you can because they’ll be much grippier, nicer to use plastic works, but it’s a bit gross. The key things to look out for with the straps is to get the buccal strap. There are plenty of brands that come with a carabiner. I find these infuriating, especially if you’re trying to use your rings at a park on a tree or some sort of uneven surface. If you have the buccal, it allows you to adjust it to whatever length you want. And the beautiful thing about Iron Edge is that they have markings as well so you can get your rings even when they’re on something, even for buckle straps, much better than the carabiner.
The next question that comes up is where to hang them so you can hang your rings on any sturdy overhead anchor point. The most basic setup, if you’re in a pinch, you don’t have outdoor space, you’re in an apartment or you just want to get something up and running is to get a cheap doorway. Chin up bar. Again, you can get these online or a sports store, 50 Aussie dollars. I think at Rebel Sport we can get even cheaper ones on Amazon. Yes, these work, yes, you have a bit less space if you’re in a doorway because there is less vertical height, but I’ve got plenty of clients who use these very happily make plenty of progress. If you’ve got more space, got a backyard or a garage like we have here, you can get a squat rack, freestanding chin up bar type setup string your rings over that you’re golden.
And the best option in terms of giving you the most space to move is if you can find some sort of anchor point in a ceiling. So we have these roof beams out the back here at my parents’ place. We bolted in metal anchor points in the roof beam, which gives plenty of space. It’s kind of up to you as long as it’s going to hold your body weight safely. Then just wait. And once you’ve got your rings hung up somewhere, you can now train your entire upper body forever. The beautiful thing about rings is that they are lightweight, portable. You can take these on the road, I put them in my backpack when travelling so that I can always hit a workout if I want to. All you need is to find an outdoor chinup bar or a tree to string them over and you’ve got your upper body gym set up.
So that is tier one, anywhere from $30 I think. Check the price on Amazon up to the most premium version, 120 Aussie dollars. Get a nice pair of rings that you like. They will serve you for life. Tier two, the easiest half of out the whole body to sort is the knee flexion half. And so for this to train Nordic curls, all we need is some sort of anchor point for our ankles. So easy solution here is to just buy a Nordic strap. These are online for 30 Aussie dollars on Amazon and they’re literally just a bar with some foam and a strap. Now this goes under your door. You can pad your knees with a folded towel and that’s your Nordic curl setup. Done. Very cheap, lightweight, easy. If you want to go more premium, you can get something that gives you solid resistance and doesn’t wiggle.
Now I think most of the issue with lateral movement is solved with a bit of practise to get better at the skill, but if you want to have more permanent setup, you can either use something like this railing we’ve got on our balcony, or if you want to invest time or money into this, you can make or buy a purpose-built Nordic bench. These are currently exorbitantly expensive to buy in Australia. Hence why I haven’t bought one myself. I don’t think it’s worth it, but I’ve got some clients who have them and they look really nice. You can also make these pretty easily from some hardware store materials, but if in doubt get yourself Nordic strap and you set within this sort of tier is the next thing to get in place and this can be sorted for free, but for your squats, the first thing you’ll need are two sturdy platforms, one either side of you so you can guide yourself through single leg squat training.
We basically just want something that’s sturdy between mid thigh to hip height that you can put all your body weight on. So this place, I just use these bar stools. They work perfectly fine. My parents place, we have some P boxes that my dad made from timber. Again, go with what you’ve got. Anything works if you want to be fancy, get nice boxes. They can be a nice option to use. You’re going to use one of these platforms, whether it be a stool or a box to elevate your feet for some progressions of your upper body movements as well. Now you don’t need it for this. You can do all your upper body training, as I said with just the rings, but whatever platform you get for your squats is going to act as a nice bridge to help you between some progressions for things like handstand push shops and one arm chin up training.
Okay, and then finally tier three, once you’ve got everything else sorted, we can talk training the rest of your lower body using loaded single egg squat. To do that, we need weight. So if you’re in a pinch or you’re travelling and you don’t want to carry weight around with you, if you have a dedicated child or friend or partner who ideally weighs somewhere between 40 to 60 kilos and they’re happy to sit on your shoulders, you can use them as the weight for loaded single leg squats. But in terms of your home gym set up, once you have these things I think is very worth investing in getting weight vests. These plus your support are going to allow you to train your squat pattern from again, beginner all the way up to elite. So what we want is just some simple way to best like this.
To start out, regardless of how strong you think you are, we’re going to want 40 kilos. So I have these 20 kilo weight vests. Two of those stacked on top of each other will be 40 kilos. I use three of these. You can start with 40 and always invest in more down the road. This is the most expensive piece of the whole gym set up. This will be well over half the cost just because weight costs money. So in Australia I think these are now up to like $170 a pop to get two of them three 40 bucks. Again, after you’ve got your rings and everything set up, it is worthwhile. I made a video on how important it’s to train legs properly, which is worth watching if you haven’t already. But that’s basically it. Three of these things, you just stack them over you.
I didn’t even bother tying any of them up anymore. I’m too lazy. But that will go a long, long, long way and again, invest in them once. It’s going to pay dividends for years in terms of your leg development. And as I said, if you’re training on the road, I still haven’t found a much better solution than getting someone on your shoulders to replace them for you in the meantime. So that’s it. That’s my entire home gym set up. That’s all the equipment I use. The only other thing to mention is you probably often see me using parallettes in some of my videos. Yes, you can get these if you want. No, they often no unique benefit to your training. You can just use rings and I almost exclusively use rings for all my training. It’s just easier to demonstrate push movements on them because they’re more stable and there’s no ring strap in the way.
So that’s another luxury to get some if you really want, but I wouldn’t worry about it. So the sum is up for you. If you’re aiming for the most budget option and you just want the cheapest way to be able to start training, get any pair of rings that you can find, ideally wooden ones ideally with a buckle strap and just make sure you’ve got somewhere to hang them. If you’re in an apartment, get a cheap doorway, chin bar that should sort you out for well under than a hundred dollars. And then get a $30 Nordic strap and you’re good to go find whatever chairs or bar stool or tables you’ve got in your place already and you’ve got everything you need other than the weight. If you want the most value for money, worthwhile solid setup, you can get a really good setup for 500 bucks, $140, high quality wooden 28 millimetre rings with buckle strap, iron edge in Australia, or find another brand that hits those specs.
If you’re overseas, find an overhead beam or instal something where you can, so you’ve got a permanent place to hang your rings with plenty of space overhead. Spend 30 bucks on H Nordic strap and get two of these weight vests, 20 kilos each, 340 bucks for the two of them from Rebel Sport. Again, if you’re overseas, find whatever’s cheapest. That adds up in Australia to $490 and that’s the exact year that I use. If you want to go luxury, same rings, same weight vests, same anchor point. But if you really wanted to, you could invest in a nice Nordic bench instead of the strap, you could get your third weight vest straight up so you’ve got it ready to go and you could either buy or make some nice wooden plyo boxes as you support platforms. So that’s it. That’s literally everything you need to train forever and make all the gains possible.
I hope this helps as many of you as possible, just start training because the gear, as I said, doesn’t need to be complicated. Anything you can get your hands on and start training sooner rather than later is going to be better because the sooner you start training, the sooner you can start getting results and you can always upgrade your equipment later on when you’ve got the cash or that you brain space to think about it. If I’ve missed anything that you want to hear about, please let me know in the comments. And if you’ve got your gear now and want to learn how to use it, links are in the description to learn more. I’ve had a lot of requests for this info, so I hope it helps. Thanks again for watching what I say.