In this video we talk about why practicing handstands is making you worse at them, and what to do instead. Here’s what we cover:
- The two big problems with handstand practice that get you no closer to achieving the skill, while often actually make you worse at them
- The core physical foundations necessary for holding an efficient, aesthetic handstand
- The specific type of skill training that does work
- How to do it yourself to achieve a consistent handstand as soon as possible
Full transcript
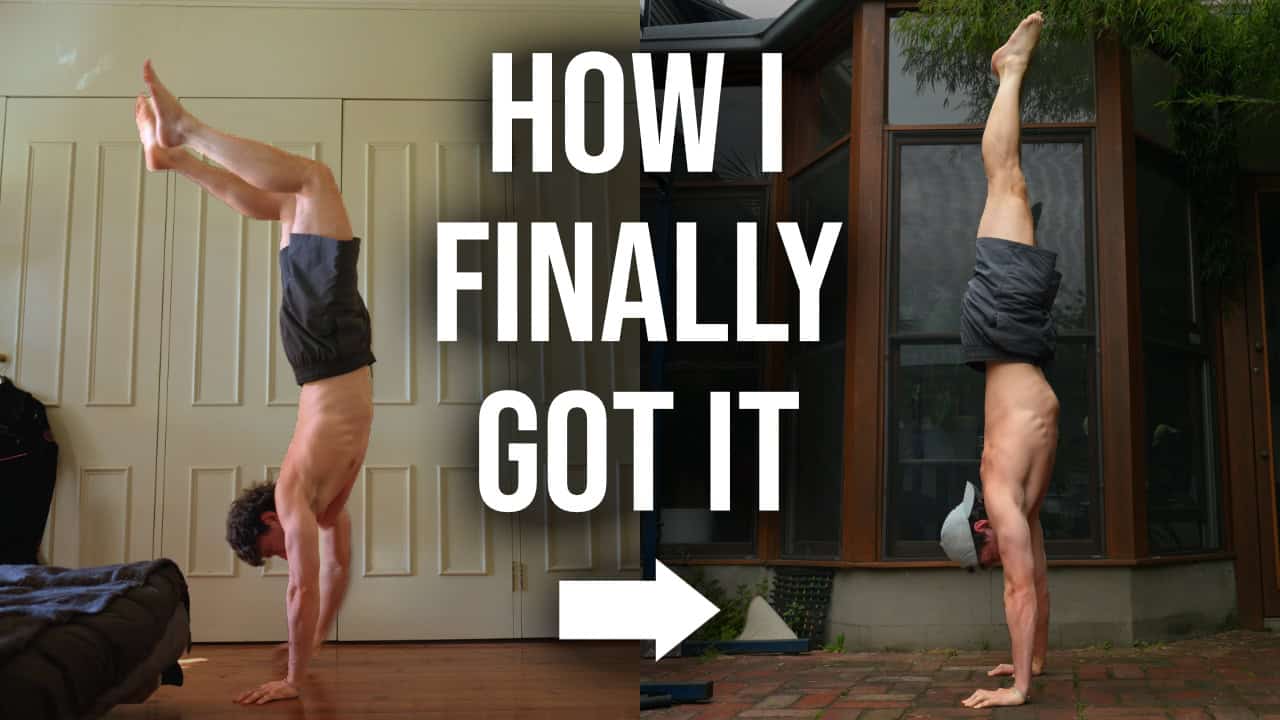
If you’ve ever tried doing a handstand, you’re probably familiar with the experience of ending up with something more like a flustered banana that’s impossible to hold for more than a couple of seconds, and you might think the answer to bridging this gap is simply more practise. I did once too, and it’s what led me to spending years on a long list of drills and exercises that left me still unable to show anyone a reliable handstand. What I didn’t understand at the time was the practise alone is not enough to achieve a handstand, but more importantly, the large majority of practise is actually detrimental to the outcome, and it’s this confusion that trips so many people up and stops them ever learning a proper handstand in their lives. It wasn’t until I stopped practising altogether and focused on other things that I ended up achieving mine and without any direct work, I went from utterly frustrated to effortlessly doing this all from my 40 minutes a week of intentional strength training and some basic knowledge.
So rather than letting you plug away at mindless counterproductive practise for the next 10 years of your life with nothing to show for it, I’m going to show you today what actually works. We’re going to go through how to build the required strength and mobility so that you actually achieve the ability to do a handstand as soon as possible, making most practise just utterly unnecessary. And then we’ll look at the exact sort of practise that actually is productive so that you can do it yourself and start moving forwards rather than backwards as most people do, and save yourself a whole heap of time and unnecessary fatigue in the process. So let’s start with the strength. This is something that I wish I’d built sooner. We’ll continue to work on forever and makes everything that’s going to follow this either easy or unnecessary. If you only apply one thing in this video, let it be this.
The number one problem most people run into when trying to do handstands is that the movement is too difficult. You might think you have the strength to hold your body weight on your hands and you very well might, but there is a big difference between being able to load your weight onto your hands and being able to hold and maintain this position because the handstand is not just a passive position that you get into. It’s an active movement that requires constant adjustment and rebalancing. And where most people go wrong is thinking that they can out skill their lack of strength. I made this mistake for years and it just drove me insane. By contrast, when you can push into a handstand position with your entire body weight or close to it, maintaining that position is orders of magnitude easier because you can literally just hold yourself there with brute force.
And this is what happened when I came back from spending a few years just working on my overhead pushing strength, building up towards a handstand pushup. The more strength you have in this movement pattern of vertical pushing, the easier handstands are, and I do not say this from a place of theory and speculation, it blew my mind how much better I was at these after years of no specific practise, just pure strength gain in my handstand pushup. If you want to cheat code, it’s this. I’m not saying it’s all you need. We’ll go through how to build the specific skill itself, but it’s pretty damn close. And I’m not saying you need to build to a full freestanding handstand pushup before you can do a handstand. Not at all. What I’m saying is every step closer you get the more effortless this entire handstand process becomes.
The problem is if you think you’re going to build significant amounts of handstand push up strength by practising handstands, you’re going to have a very tough time making any progress. And this is the first big reason why handstands is paradoxically a really bad way to achieve a handstand because it just does not give us the chance to load this movement to maximum intensity or give us the stability and range of motion over which to apply that intensity so that we actually build the significant amounts of muscle mass required for this strength. Strength gain is a physiological process that takes time, and if we want to max that out, reach our goal as soon as possible. We need to load this movement as heavy as possible, but also be in control of it so we can train it across a full range of motion for as long as desired to reach a satisfactory stimulus for our bodies for the week.
Then we need rest and recovery and we need to repeat this process for as many weeks as necessary until our shoulders are physically bigger and stronger and can move our body through space in this position. The good news is doing this doesn’t just give us handstands. You have to build muscle mass to achieve this, which is going to make you look better, allow you to be leaner. It’s one of only six movement patterns that I trained. This is the physique that’s resulted from enough strength development in those movements. This is the best, most reliable way to possibly be able to do at handstand, but the ability to do it handstand honestly pales in comparison to the benefits this gives you in terms of muscle mass, body composition and shoulder health. And you only need to dedicate three minutes a week to doing this. That’s all I did to achieve this, and it’s all I do now.
I’ll link a video you can watch to get started working on that or you can just join my programme and learn the whole lot links are below. Okay, so that’s strength. Next thing to think about is mobility as opposed to strength, which is something you want to work on forever. Mobility is something you can work on until it’s achieved for any specific flexibility goal, you’d only need a few months of in intentional work to get to a good standard and then that will all but maintain itself. The core essential range is shoulder flexion. If you can’t get into a fully overhead flex position like this, you’re simply not going to be able to hold an efficient, good looking handstand. You’ll be stuck doing floppy bananas, which are very difficult to hold consistently. Now, if you already have this mobility, you don’t need to worry. It’s going to be maintained largely just by you training your overhead, pushing strength properly through full range of motion.
But if you’re currently lagging behind, there is some direct work you can do to unlock this quickly, add it to your routine for the next few months until you get it up to speed, and that will go a long way in accelerating your progress towards your handstand. Here’s a video you can watch to go learn that While we’re on the subject of mobility, there’s some other optional movements you can work on if you’re interested in doing things like handstand presses or advanced entries into the handstand. As I said, these aren’t essential, but more mobility will mean less strength required to do these movements. So if you want to be able to do these sort of handstand entries sooner, hitting these flexibility standards will help for straddle presses and stallers. You want to work your pancake flexibility. I recommend building to the point where you can get your chest touching the floor and for park presses, you want to work your park position ideally getting to the point where you can rest your forehead on your shins.
Once your strength training is happening and you’re covering any mobility deficits that are going to hold back your progress, now we can talk about learning the actual skill to apply that physical ability and do a handstand. So I’m going to show you the process that this has worked really well for me. This is stuff you can play around with. If you get sick of it, don’t worry. And if you find yourself getting stuck, drop it. Keep working on your strength and mobility. This is always there to come back to. And once you have enough strength and mobility, it shouldn’t take a huge amount of skill work to figure out how to do this. So I’m going to show you how to proper handstand alignment. Then we’re going to start applying this with assistance upside down and then I’ll show you how to transition over time into a freestanding handstand like this.
So there’s two core elements to learning the alignment of the handstand. The first thing we’ve got to get right is our pelvis. So what we need is posterior pelvic tilt. And how you can think about this is imagine your pelvis is a bowl of soup. You’re trying to tip the soup out the back behind you and you’re going to tip it back as far as you possibly can, squeezing your glutes, tensing your core. You can practise going in and out of this, but make sure you’ve got as much posterior pelvic tilt as possible. The second point is to get into this overhead flex shoulder position. And in this position, we want to elevate our scapula. And so to do that, you can think about basically pushing the sky overhead as high as you can. This is going to elevate your scapula, bring your shoulders up.
Another cue you can use is thinking about touching your shoulders to your ears as if they’re e muffs. So those are our two positions. You want to get into those at the same time and squeeze as hard as possible. Tip the bowl of suit back, push the sky over your head, hold those earmuffs tart to your ears. Practise these two simultaneous positions until they make sense. Then we can take this to the floor. Now that you’ve done this under zero load, we can do this kind of in between variation, which will demand a bit more active flexibility. Again, if you run into troubles here, just go back to working on points one and two, strength and mobility. And as you progress, these drills will become much easier. So you can do the same thing on the floor here. First thing is to get posterior pelvic tilt.
Then you can lift your arms off the floor. Exact same thing, keeping your elbows straight, trying to bring your shoulders to your ears. You should realise that your belly button is not touching the floor. If it is tense it harder. Tilt your pelvis further and try and hold this position for as long as you can. Once you’re feeling confident with this and it’s all making sense, now we can take it to the wall. So the next step is to take the alignment that you’ve learned with those drills and start practising them upside down. Never ever practise with your back to the wall unless you want your handstands to look like this. We’re never going to practise doing them that way again. And a wall just encourages that because it’s the only way you can possibly balance. So what we’re going to do instead is walk up the wall, keeping our chest facing it and try and get as close in as we can.
At this point, now that you’ve loaded your weight onto your hands, we’re going to do the exact same thing, posterior pelvic tilt, elevate our scapula, push the floor away as hard as we can while tensing our core, keeping our belly buttons in. Only your toes should make contact with the wall ever. And so once you get your alignment and you’re feeling tight, just like we were with our drills, you then basically just want to walk in as close to the wall as you possibly can. Just like when we practise this on the floor, this is going to force you to be in that proper hollow body alignment. And if you start having other parts of your body touch the wall, you know that you are getting sloppy. As you practise this, your goal is then over time to have less and less and less weight on your toes and take all the load onto your hands because the next step is to then start transitioning into freestanding handstands.
The only difference between the wall drill and freestanding will be that you continue taking load off those toes until there’s no load on them at all and they’re now in the air. And before we talk any further, I want to reiterate what we are practising here now is a skill. Yes, that skill requires the use of strength that we’ve developed in our strength training, but that is not what we’re trying to build here. The more we fatigue by doing this practise, the worse our form is going to get. The more that alignment’s going to break down the sloppier, our balance is going to be that means worse quality practise, which is not necessarily productive. The more we practise bad handstands, the better we get at doing bad handstands, and that’s not a pattern that we want to be ingraining into our nervous systems. So as tempting as it is to do this over and over and over again, the most important thing you could learn from this skill section is that more practise is not going to mean better results.
And very often the more you can restrain yourself and keep that practise to the quality work that happens early when you are fresh and have plenty of strength, the faster your development is going to be because then you’re only practising good handstands rather than good and bad. Just then confusing for your nervous system is going to slow down your progress towards the good ones. So in terms of practical advice, we want clean practise, which means minimal practise. So what I’d suggest doing is practising these frequently, but pulling yourself up and stopping as soon as you start to get tired and your form breaks down. Like with strength training, less work of a higher quality not only means less time and more fun, but better results. So with that in mind, your progression here is just to get toes off the wall for longer and longer times until you can hold a handstand position unassisted for solid periods of time.
Building your handstand foundation this way allows us to just skip all the wasted time and energy and effort that would go into the trying to get into these from a KickUp and just get straight to working on the handstand skill itself. Because once you work this enough to consistently be able to get solid periods of time off the wall unassisted, you now have a position to kick up into. And that’s when we can start to look at entries into the handstand without using the wall. So there’s a few types of KickUp that you can use if you have the strength and mobility controlled. Pressing is the easiest, most reliable way to get into a handstand. The issue with dynamic KickUp movements is that there’s a hole of momentum that you’ve got to try and stop midair. It’s actually much harder than just pressing under control into the position.
So the easiest ones are found are straddle presses. Bear in mind, you can do a little jump if you need to help you through the bottom part of the range, which is by far the toughest in terms of mobility and strength. You can always improve that over time as those things continue developing. The other type you can use is a tuck press. You’ll need to jump into this, and once you can easily do a form of KickUp or press into a handstand and hold it, well, congrats. You’ve now learned the movement. As your strength and mobility continue to progress as they will with your strength training, you can then over time advance the level of press that you can use to enter the handstand. So in terms of strict presses, straddle press is the easiest. Then you can build up to doing park presses. And then the most advance is the stall press starting in a straddle elif.
You can also do variance of this on the parallel bars or ettes, which make them easier again. And that’s it. Hopefully this gives you a pathway to actually achieving a handstand that’s consistent and controlled rather than doing a bunch of random practise that doesn’t lead to any actual progression. And if this all seems like a lot of work, just remember the handstand, like with all body weight skills, is almost entirely a byproduct of having a body that can move. Well. As much as I’d love to give you one, there just aren’t any shortcuts to achieving a handstand. The strength and mobility and physique that come with it, they’re all an inseparable part of the whole. So if you really want this movement, my advice is just build the lot because it works. And while it may take months or years to achieve, it only needs to take 40 minutes a week. And if these are things you want, not just now, but long term, or you’ll want to be doing it forever anyway, as I said, if you need help with it, you can learn more about our process in the links below. Let me know how you go with this. I look forward to hearing from you all. As always, happy handstands.